Showing posts with label krylon. Show all posts

Saturday, December 4, 2010

An Idea…Yup! It Worked!

sculpey blk

When I first got this new set, Ornaments, from Our Daily Bread designs  and the Spellbinders Heirloom Ornaments….I had an idea of using Sculpey clay by Polyform!

sculpey ornament

After conditioning my clay, I ran it through my “clay dedicated” pasta machine until I got the size needed. I stamped it first in Stazon black and started coloring with Twinkling H2O’s…but they just didn’t “grab” the clay and lay down a nice color. I just laid down the SB die, pressed down good to leave a good impression, then took my TH scissors and carefully trimmed it.

So…*lightbulb*… why not try acrylic paint. Even the gold trim is paint.

After painting it though, I did have to over stamp (using my stamp positioner) because I lost some of the image definition. Then I baked it in “clay dedicated” toaster oven @275 for 15 min.

Shhhhh…don’t tell the boss, but I’m going to send this to her for one of her 9 trees! LOL

I wanted to dress up the gold cording a bit so I dug through my beads. The rose ones were perfect but I needed some gold beads with big enough holes to fit the cording….hmmmm…

*another lightbulb moment*… I used wooden beads and colored them with my Krylon gold leaf pen! 

sculpey beads

I’ve done lots of light switch covers and other things with Sculpey but never something quite like this! Fine tuned, this could be FUN!!

Thanks for stopping!

Dawn

Friday, July 2, 2010

A Digi Liberty Sale and Christmas Too!

ODBD July release blog hop is here

F4A19 blk

What could be better than a sale and Christmas in July!! Have a look-see at Sassy Cheryl's!

  • 20% OFF Digi's and Colored images through July 4th.
  • 15% OFF Commercial Licenses through July 4th.
  • After the 4th sale, the Christmas/winter digi stamps and colored images will decrease to 10% through the end of July and non Christmas/winter images will go back to normal pricing.

Here is Liberty Bear

F4A19 sideThis was done for the F4A (Free for All) challenge on Splitcoast, to use gold stars.

F4A19 stars 

The star brads and USA charm were silver, I just used my Krylon gold pen! (I also cut the loop off the charm).

F4A19 Liberty Bear Stars 4U

Have a safe and wonderful 4th of July weekend!!

Thanks for stopping!

Dawn

Tuesday, June 1, 2010

ODBD June Release Blog Hop!

God Remains blk2

Every month I think it can't get any better...then Kelley shows us the new sets!!
Oh My!!
Wait till you see what all the girls have been doing with this release!

This hop is different.... there are no secret words to collect, no email to send... just a fun blog hop. If you arrived here from Chris's blog you are in the right place!  If you just happened on my blog you might want to go to the ODBD blog and start from there!!!
Here is what you have to do to be eligible to win one of the prizes:

  • Hop to each blog, leave a comment on each one.
  • Return to the ODBD blog hop post and leave a comment there telling us that you completed the hop and left everyone comments.
  • If for any reason you cannot leave a comment, please give us the name/s of the designers you were unable to leave comments for... and you'll still be qualified for the drawing.

Here's the fun part!  There are THREE prizes of $15.00 Gift Certificates to the ODBD Store, but they are hidden on three different designer's blogs, and even the designers don't know themselves who has them yet!!!
  • The Blog Hop will run from 8am Eastern June 1through 8pm Eastern June 2.
  • At that time the three designers with the prizes will be notified and they will randomly select their winner from their comments. (So be sure to leave comments on all their blogs!)   
  • They will check the ODBD post to be sure the person they draw has left their comment there, stating that they have completed the hop....
  • Then they will give the name to Grace, and the winners will be announced on Sat. the 5th along with the Shining the Light Challenge!  Good luck and have fun!!!

Now, here's my card!

God Remains frntI used From Me To You, God Loves You and Scripture Series 1. I stamped the Fuchsias in black on Labels 10 nestie and sponged with Distress inks, then I stamped the single flower from God Loves You, colored with Copics, Versamarked/clear embossing powdered, heat set and cut them out. I freehand cut the black layer to match. Each layer is edged with a Krylon gold leaf pen. The scripture is embossed with Ranger Detail Gold. The bling is Kaiser Kraft.

God Remains scripture God Remains inside

The single flower from God Loves You is randomly stamped, then I curved the sentiment a bit on my acrylic block before stamping.  The edges are lightly sponged with Distress ink.

Now,
it's time to
head on over
to
Julie's blog!

Thanks for stopping!

Dawn

Monday, January 4, 2010

Coloring "Mo" 3 Ways

IC213 blk

Mo Manning to the paper craft world is what Maruice Sendak is to children's books...masters! Well, that's my humble opinion anyway! I just love coloring Mo's digital images!
thanks to Mel for the analogy!

I have 3 to share today, all done with a different coloring medium... just for fun!

Making Cards closeup This one is called Making Cards (perfect right?! lol). Done for the Sketch Challenge on Splitcoast.
I hadn't used my Prismacolor pencils in a while and after seeing an example on Mo's blog, I had to try!

SC261 Colored Just For YouI use baby oil to blend my Prismas. And I did cheat just a little with her crayons..I used Copics on those, they were so tiny! The layer that the image is on is "faux cardstock"... it's white cs colored with a Copic marker to match the color of her tutu! You never have to worry if you don't have the right shade for layers this way! *wink*

~*~*~*~*~*~*~*~*~*~*~*~*~

This next one was for the Inspiration challenge on Splitcoast. Here is the piece I used for my inspiration.

IC213 Insp Pic

I knew as soon as I saw it I had to use Bronte again!

IC213 closeupThis one is "Bronte and Louis". It's colored with Copics. To achieve the the patchwork background, I started by drawing my lines with a fine tip artist pen and ruler. For the center area behind Bronte and Louis, I masked it off using sticky notes before coloring.
The white lines were made with an Elmer's Painty pen.

IC213 Sharing CookiesLayered on another piece of Georgia Pacific white (yes, the cheap stuff from SAMS!) and then on black from Hollo's (paper by the pound! $1.25! yeah baby!!)  The card measures 4.25x4.5.

~*~*~*~*~*~*~*~*~*~*~

Watercoloring is something I haven't done on digitals. Would the printer ink bleed? Had to try! It did want to bleed a little, so what to do? I have a can of Krylon fixitive...another why not try it! It worked like a charm!! Hmmm, that will definitely be used on all my digital work from now on!

Young Love closeupThis one is one of Mo's newer images, "Young Love". This was a double challenge. Mo's MDP #12, cards and projects that represent a "New Beginning"... so what's that?  Well, it can mean a new baby, the New Year, a new job, new home, or anything else that you decide is 'new'.
And the Technique Challenge on Splitcoast,
Paper Quilting. One thing I don't do is quilt!!

Young Love closeup2 This one is watercolored with Caran d' ache crayons and a waterbrush. The "quilted" piece is faux stitched DCWV Once Upon a Time. There's my faux cardstock layers again with Copic V17, Amethyst and Spellbinders Labels 2.
The stitching on the Spellbinders Labels 3 is real stitching, doubled button hole thread.
The sentiment is computer generated.

TLC254 Another Year Quilted

~*~*~*~*~*~*~*~*~*~

So, there you have it...3 different ways to color. Copics are still my first choice (I'm lazy! they're so easy!!) Hope you've enjoyed my post today.

Thanks for stopping!

Dawn

Thursday, October 1, 2009

ODBD Starts October With a New Release Blog Hop!

If you got here from Sandee’s blog, you are in the right place! If not go to the ODBD BLOG and start from there.

Make a comment on every blog because there is CANDY hidden along the way!!! And you know what?... even the Designers don't know yet who has the candy!!!  You'll be happy to know that there are THREE prizes to be given away... and they are for Store Credits to the Our Daily Bread Designs Store! 

This hop will be open for comments until 6PM EST Friday Oct 2 and the winners will be announced on the ODBD Blog on Sat. Oct 3.

~*~*~*~*~*~*~*~*~*~*~*~*~*~

These are the 3 new sets

With%20Deepest%20Sympathy


Praying%20for%20You


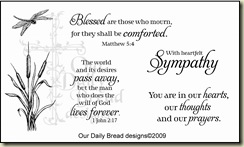
With%20Heartfelt%20Sympathy


I have two projects I want to share with you today
using the new sets.

No More Sorrow

Where do I start to tell you how I put this one together! Actually I started with cutting the ovals with my Nesties…then the torn paper (which I set aside for a bit) and the verse stamped on white.

Now what?!  As soon as I saw these sets, I knew I had to work in some Mudd Puddles sand!

I inked up the clump of cattails from With Deepest Sympathy (the image with the dock, trees, boat…yeah, just the little clump of cattails!), and stamped them 3 times. Even though the “water ripples” stamped with them, it worked out ok!

Then I colored them in with my Copics and sponged the sky with distress inks. I also used my cloud template to add a few clouds.

I figured out where my “torn water” would go, applied Coral Mudd Puddles sand, and let it dry before attaching the “water”.

While the sand was drying, I stamped the cattails and dragonfly from With Heartfelt Sympathy, in Versamark and Espresso and clear ep. They’re colored with Copics.

Assemble and add the dab of sand under the cattails… Actually a very simple, (yet it looks like you spent hours!) card to do!

stamps: with deepest sympathy, with heartfelt sympathy, praying for you paper: gp white, prism ink: adirondack espresso, versamark, mustard seed, scattered straw, broken china, faded jeans other: mudd puddles sand, spellbinders, clear ep, embossing folder, copics, foam dimensionals

~*~*~*~*~*~*~*~*~*~*~*~*~*~

Now, I haven’t done one of these for a while and thought these cattails would look really cool…sooo……

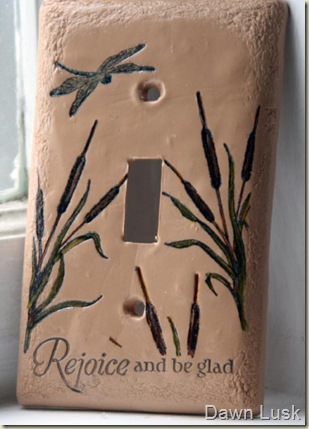
Rejoice Light Cover I gave it a try… this is Sculpy clay. I ran it through the pasta machine (used only for clay!), molded it over a light switch cover, stamped and baked in the toaster oven (baked it still on the light switch cover…at 250 it can withstand the baking! and it pops right off once it’s cool enough to handle!).
Rejoice and be glad is from the top of the verse from With Deepest Sympathy. It was a little tricky to get just that little bit stamped without leaving an impression from the rest of the verse in the clay!
That’s when I figured I needed some “texture” to help hide what did impress! (see, the magic of stamping again… you can almost always fix it!) I used a dry, regular ol’ household sponge and just went around the edges before baking.
light cover closeup

It’s colored in with Copics then I gave it a coat of Krylon Crystal Clear just to give it a protective coat.

Well, I hope you’ve enjoyed this post and maybe learned something to boot!

Don’t forget to visit all the blogs and leave a comment so you have a chance at winning!

From here you should hop to…
Connie Angella & Deb


As always, thanks for stopping!

Dawn

Thursday, August 21, 2008

Krylon and Thomas Kinkade

Today's Ways To Use It challenge on SCS was perfect for me today for a number of reasons.

1. Sharon, at Krylon, sent me some fabulous product to try...so I had to!
Thank YOU Sharon!! 2. Tearing paper....how much easier can it get!

3. I have these gorgeous Thomas Kinkade papers.

4. I don't have a lot of stamping time...(Lloyd thinks I need to spend every waking moment doing something with peaches...remember the peach tree? yes, still lots to put up!!)!
I took the piece of Tawny cardstock and sprayed it with Make It Stone. It's fairly dry in 15 minutes, easy enough to handle in about 30. Around the edge of the scene, I masked it using a piece of torn copy paper just smaller than the scene and sprayed it with Make It Suede. You just can't get the full effect here...but it's soooo cool!
I also took my Stardust gel pen and added some sparkle to the windows and campfire.

Easy peasy! Stamp the sentiment, add some brads and this baby is done!

Did I mention the pear tree thought it had to out do the peach tree? Yes, lots of them too!!

Ok, I'm off to do 'something' with peaches...right now cobbler sounds good!

Thanks for stopping!